In nature, some species of bacteria can acquire exogenous DNA from the surrounding environment through a process called transformation. The newly acquired genetic information is both stable and heritable.
In the laboratory, scientists can force bacteria like E. coli to take up DNA and become transformed, even though many bacteria are not naturally competent. It is believed that the combination of calcium chloride and a rapide change in temperature - or "heat shock" - alters the permeablity of the cell wall and membrane, allowing DNA molecules to enter the cell.
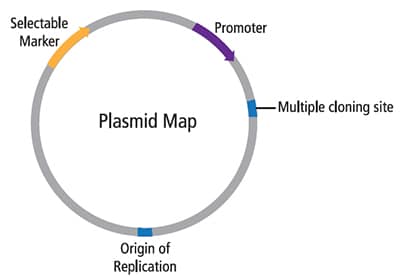
What is a plasmid?
In addition to their chromosomal DNA, many bacteria possess extra, non-essential genes on small, circular pieces of double-stranded DNA. These pieces of DNA, known as plasmids, allow bacteria to exchange beneficial genes. For example, some genes that confer antibiotic resistance can be transferred between bacteria on plasmids.
What is genetic engineering?
Genetic engineering is the use of biotechnology to alter an organism's DNA. Recombinant DNA technology has allowed scientists to insert genes from different sources into bacterial plasmids. Once transformed, the bacteria can produce large amounts of important proteins from such plasmids, essentially converting cells into living factories. Insulin, which is used to control diabetes, was the first medication for human use to be produced by genetic engineering.
Colony Transformation of E. coli with Plasmid DNA:
Experiment Summary:
In colony transformation, the host E. coli bacteria will be grown for 18-22 hours on LB-agar "source plates," collected using a sterile loop, and made competent in CaCl2. Next, the plasmid will be added to half of the cells before they are briefly heat shocked. Finally, the bacteria will be allowed to briefly recover before they are plated on LB-Agar plates and incubated at 37° C overnight. This protocol does not require a centrifuge.
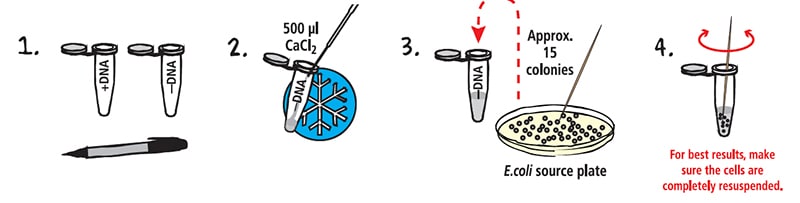
1. LABEL one microcentrifuge tube with "+DNA" and a second microcentrifuge with "-DNA."
2. TRANSFER 500µl ice-cold CaCl2 solution into the "-DNA" tube using a sterile 1 mL pipet.
3. Using a toothpick, TRANSFER approx. 15 well-isolated colonies (each colony should be approx. 1-1.5 mm in size) from the E. coli source plate to the "-DNA" tube.
4. TWIST the toothpick between your fingers to free the cells. RESUSPEND the bacterial cells in the CaCl2 solution by vortexing vigorously until no clumps of cells are visible and the cell suspension looks cloudy.
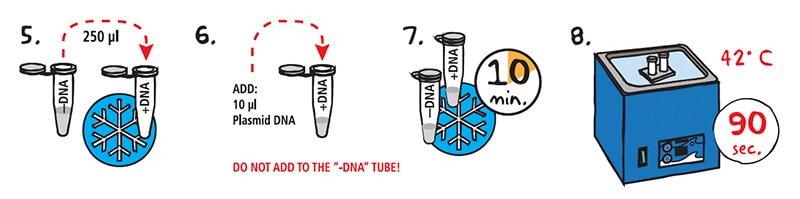
5. TRANSFER 250 µl of the cell suspension to the tube labeled "+DNA." PLACE tubes on ice.
6. ADD 10µl plasmid DNA to the tube labeled "+DNA." DO NOT add the plasmid to the "-DNA" tube.
7. INCUBATE the tubes on ice for 10 minutes.
8. PLACE the transformation tubes in a 42° C water bath for 90 secondds.
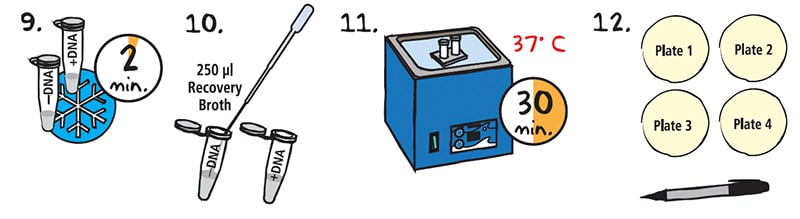
9. Immediately RETURN the tubes to the ice bucket and INCUBATE for two minutes.
10. TRANSFER 250 µl of Recovery Broth to each tube using a sterile 1 mL pipet. Gently MIX by flicking the tube.
11. INCUBATE the cells for 30 minutes in a 37° C water bath.
12. While the cells are recovering, LABEL the bottom of four agar plates as specified by the protocol.
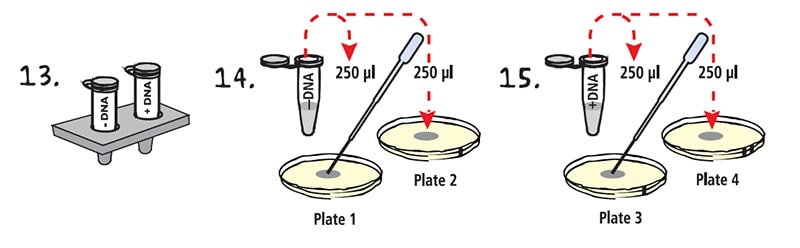
13. After the recovery period, REMOVE the tubes from the water bath and place them on the lab bench.
14. Using a sterile 1 ml pipet, TRANSFER 250 µl recovered cells from the tube labeled "-DNA" to the middle of the specific plates as outlined in your protocol.
15. Using a new sterile 1 ml pipet, TRANSFER 250 µl recovered cells from the tube labeled "+DNA" to the middle of the the specific plates as outlined in your protocol.
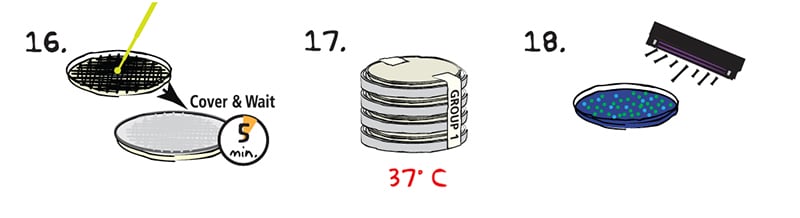
16. SPREAD the cells over the entire plate using an inoculating loop. Use one sterile loop to spread both -DNA samples. Change to a fresh loop before spreading the +DNA samples. Make sure the cells have been spread over the entire surface of the plates. COVER the plates and WAIT five minutes for the cell suspension to be absorbed by the agar.
17. STACK the plates on top of one another and TAPE them together. LABEL the plates with your initials or group number. PLACE the plates in the inverted position (agar side on top) in a 37° C bacterial incubation oven for overnight incubation (16-18 hours). If you do not have an incubator, colonies will form at room temperature in approximately 24-48 hours.
NOTE for Step 17: It may take longer for the cells to absorb into the medium. Do no invert plates if cells have not completely been absorbed.
18. VISUALIZE the transformation and control plates. Some experiments require the use of a UV light source.
Enhanced Transformation Protocol:
This procedure creates a liquid culture of competent cells that can produce superior transformation results. It also offers additional flexibility for the teacher and students. The protocol requires additional recovery broth and a specially formulated competent cell solution (both provided in the kit components). It also requires the use of a centrifuge. In this protocol, you will prepare the starter cultures while your students will prepare the competent cells and perform the transformation. However, if class time is limited, you may decide to prepare the competent cells as part of the teacher's prelab.
1. RETRIEVE the competent cell tubes and place immediately on ice. LABEL one tube "+DNA" and the other tube "-DNA."
2. ADD 150 µl ice-cold CaCl2 solution to both tubes. MIX by gently pipetting up and down several times.
3. ADD 10 µl of the plasmid DNA to the tube labeled +DNA. Do not add anything to the -DNA tube.
4. MIX the cells by gently pipetting up and down several times.
5. INCUBATE both tubes on ice for 10 minutes.
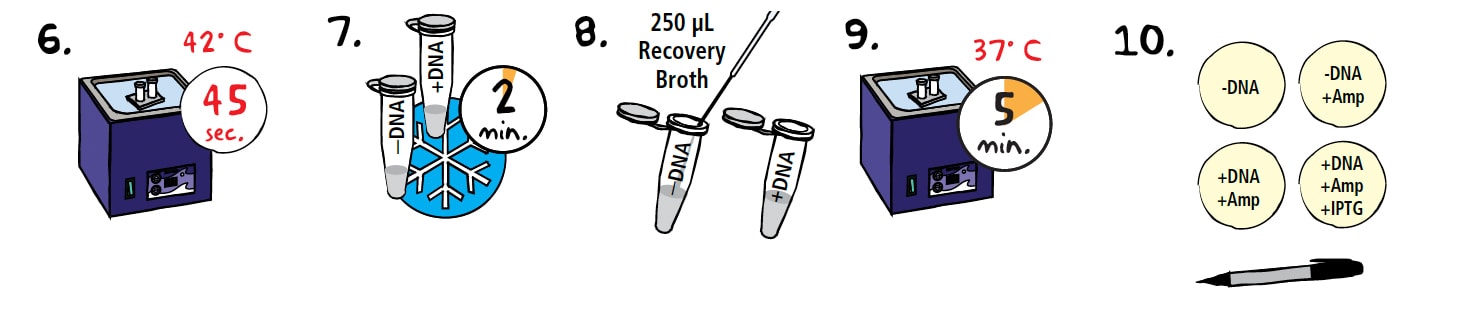
6. Quickly PLACE both tubes in a 42° C water bath for 45 seconds.
7. Immediately RETURN the tubes to the ice bucket and incubate for 2 minutes.
8. ADD 250 µl of Recovery Broth (RB) to both tubes using a sterile 1 mL pipet. Gently MIX by flicking each tube.
9. INCUBATE both tubes for 5 minutes in a 37° C water bath.
10. While the cells are recovering, LABEL the bottom of four agar plates as indicated below. Keep labels small and along the edge so you can easily see your colonies at the end. • -DNA (plate with no stripe) • -DNA/+Amp (plate with one stripe) • +DNA/+Amp (plate with one stripe) • +DNA/+Amp/+IPTG (plate with two stripes)
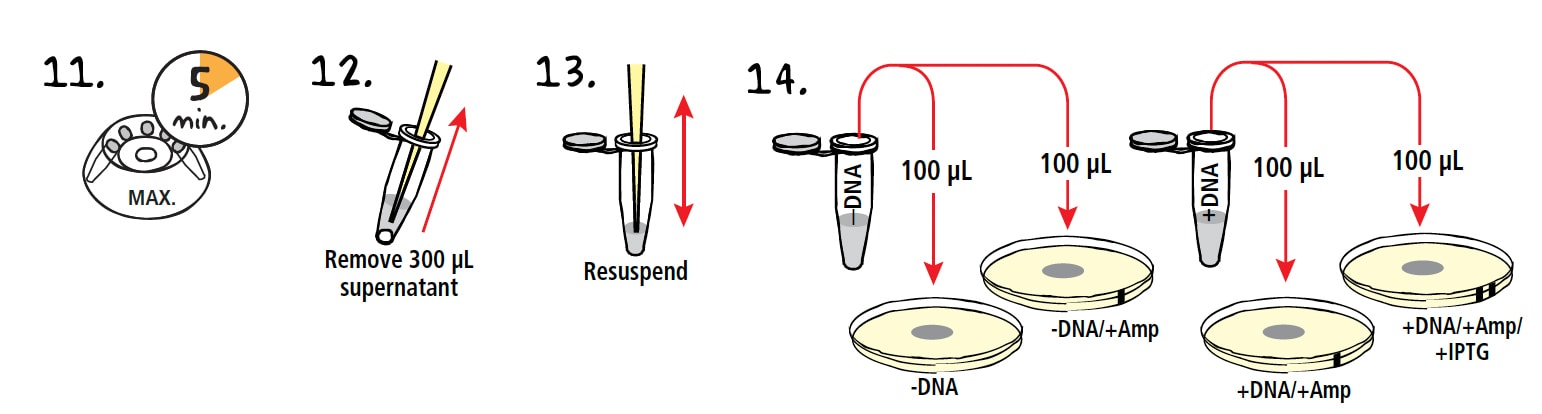
11. After the incubation, REMOVE the tubes from the water bath and CENTRIFUGE for 5 minutes to pellet the cells.
12. REMOVE and discard 300 µl of supernatant. DO NOT DISTURB THE PELLET.
13. RESUSPEND the pellet in remaining liquid by slowly pipetting up and down.
14. With a new pipet, TRANSFER 100 µl of the transformed cells to the center of the appropriate LB agar plates.
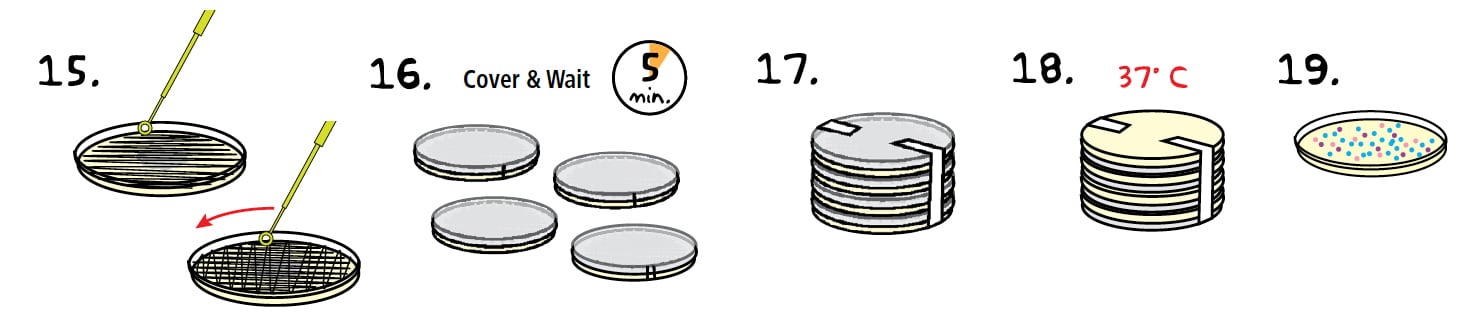
15. Using a sterile loop, SPREAD the cells evenly and thoroughly over the entire surface. Turn the plage 90° and thoroughly spread again. Use the same loop for both "-DNA" plates, then use a second sterile loop for both "+DNA" plates.
16. COVER the plates and allow the liquid to be absorbed for 5 minutes.
17. STACK the plates on top of one another and TAPE them together. LABEL the plates with your initials or group number.
18. PLACE the plates in the inverted position (agar side on top) in a 37° C bacterial incubation oven for overnight incubation (16-18 hours). If you do not have an incubator, colonies will form at room temperature in approximately 24-48 hours.
19. VISUALIZE the transformation and control plates. Some experiments require the use of a UV light source.
 In nature, some species of bacteria can acquire exogenous DNA from the surrounding environment through a process called transformation. The newly acquired genetic information is both stable and heritable.