SDS polyacrylamide-gel electrophoresis, or SDS-PAGE, is a technique that is used to separate proteins according to their molecular weight.
What do I need to separate proteins?
In addition to your DNA sample, you will need:
Sodium Dodecyl Sulfate (SDS) – a strong detergent with a hydrophobic tail and a negatively charged head.
Reducing Agent - breaks covalent bonds between protein subunits.
Gel Loading Solution - includes glycerol to help protein samples enter into the wells and a visible dye to monitor sample migration through the gel.
Polyacrylamide Gel - the separation matrix formed by polymerization of acrylamide monomers and chemical crosslinkers.
Electrophoresis Buffer - contains ions necessary to conduct an electrical current, maintains pH.
Vertical Electrophoresis Apparatus - holds the uffer and the gel, has positive and negative electrodes.
Power Supply - generates the current necessary to move proteins through gel.
Micropipette and Tips - used to transfer samples into wells.
Protein InstaStain™ - used to visualize proteins.
How Does SDS-PAGE separate proteins?
Proteins produce a unique challenge for electrophoresis because they have complex shapes and different charges, which affect how they migrate through the gel. In order to accurately separate proteins by molecular weight and not by shape or charge, the secondary structure of the protein is unfolded using the anionic detergent sodium dodecyl sulfate (SDS) and a reducing agent. The reducing agent breaks covalent bonds that link protein subunits.
After denaturation, the mixture of proteins is added into depressions (or "wells") within a gel, and then an electrical current is passed through the gel. Because the SDS-protein complex has a strong negative charge, the current drives the proteins through the gel towards the positive electrode. At first glance, a polyacrylamide gel appears to be solid. On the molecular level, the gel contains channels through which the proteins can pass. Small proteins move through these holes easily, but large proteins have a more difficult time squeezing through the tunnels. Because molecules of different sizes travel at different speeds, they separate into discrete "bands" within the gel. After the current is stopped, the bands are visualized using a stain that sticks to proteins.
Performing SDS-Page with Protein Samples:
Protein Denaturation:
Denatured proteins tend to form super-molecular aggregates and insoluble particulates. Heating disrupts aggregates of denatured proteins.
NOTE: PROCEED to gel loading if your lab instructor has already heated the protein samples.
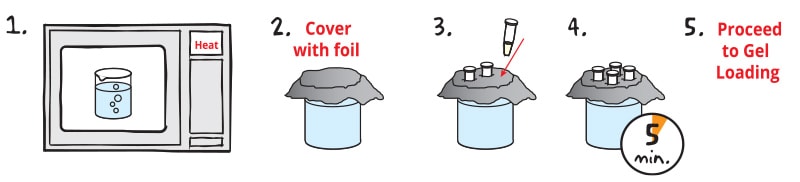
1. Using a hot plate or microwave, HEAT a beaker of water until it boils.
2. COVER with aluminum foil and carefully remove from heat.
3. Tightly CAP sample tubes. PUSH tubes through foil to suspend in the boiling water.
4. INCUBATE the samples for 5 minutes.
5. Immediately PROCEED to loading the gel while the samples are still warm.
FREEZING PROTEINS: Unused portions of the protein samples can be frozen for later use. When needed, repeat steps 1-4 and proceed to Loading the Protein Samples.
Preparing the Polyacrylamide Gel and Chamber:
Preparing the Polyacrylamide Gel and Chamber: NOTE: Although precast polyacrylamide gels and protein chambers will vary slightly in design, the procedure for their use will be similar.
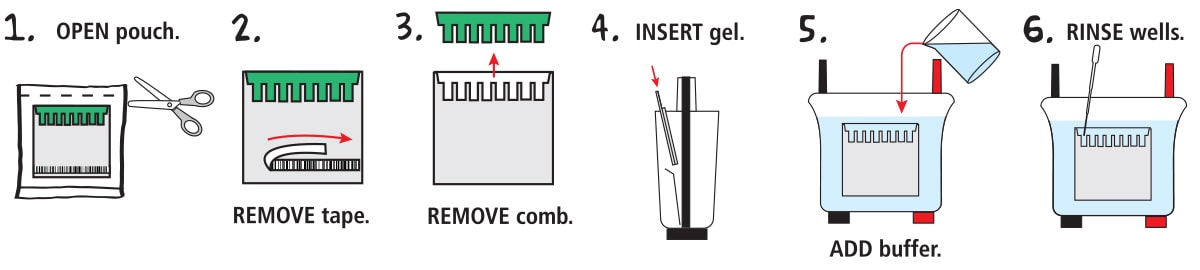
1. OPEN the pouch containing the gel cassette. Remove the cassette and place on bench with the shorter front plate facing up.
2. Gels may feature a sticker or tape at the bottom of the front plate. REMOVE the tape (if present) to expose the bottom of the gel.
3. Carefully REMOVE the comb by gently pulling upwards. Pull the comb straight up to prevent damage to the wells of the gel.
4. INSERT the gel into the electrophoresis chamber. Orient the gel according to the manufacturer's instructions. NOTE: For EDVOTEK® vertical electrophoresis chambers, the short plate shold face the middle of the apparatus.
5. ADD diluted electrophoresis buffer to the chamber. The buffer should cover the top of the shorter plate.
6. RINSE each well by squirting electrophoresis buffer into the wells using a transfer pipet. Using the transfer pipet, carefully straighten any wells which may have been distorted during comb removal or rinsing.
The gel is now ready for practice gel loading or sample loading.
Practice Gel Loading (Optional)
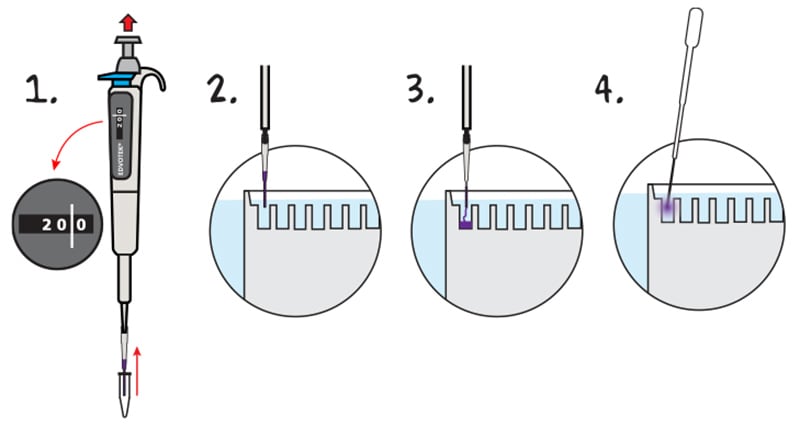
1. PLACE a fresh tip on the micropipette. REMOVE 20 µL of practice gel loading solution.
2. PLACE the lower portion of the pipette tip below the surface of the electrode buffer, directly over a sample well. The tip should be at an angle pointed towards the well. The tip should be partially against the back plate of the gel cassette, but the tip opening should be over the sample well. Do not try to jam th epipette tip in between the plates of the gel cassette.
3. EJECT all. thesample by steadily pressing down on the plunger of the automatic pipette. Do not release the plunger before all the sample is ejected. Premature release of the plunger will cause buffer to mix with sample in the micropipette tip. Release the pipette plunger after the sample has been delivered and the pipette tip is out of the buffer.
4. REMOVE the practice gel loading solution from the sample wells. FILL a transfer pipet with buffer and SQUIRT a stream into the sample wells. This will displace the practice gel loading solution, which will be diluted into the buffer and will not interfere wiht the experiment. NOTE: Practice gel loading solution must be removed from the sample wells prior to sample loading.
Loading the Protein Samples & Running the Gel:
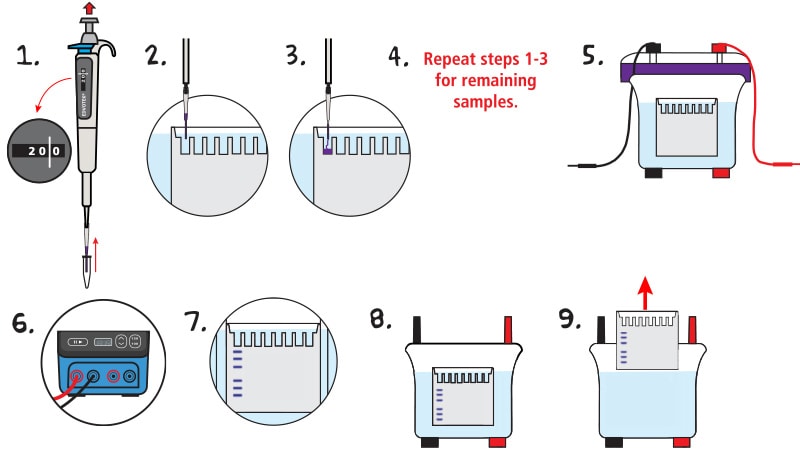
1. Using a fresh fine tip micropipette tip, MEASURE the first sample as indicated in Table 1.
2. PLACE the pipette tip under the buffer and directly above the sample well, resting gently against the back plate of the gel cassette.
3. Slowly DISPENSE the sample by depressing the plunger.
4. REPEAT steps 1-3 for remaining samples in Table 1, changing the tip between each new sample.
5. Once all samples have been loaded, carefully PLACE the cover onto the electrode terminals.
6. CONNECT the electrical leads to the power supply.
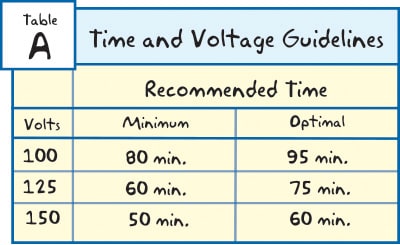
7. SET the voltage of the power supply and PERFORM electrophoresis (See Table A for time and voltage guidelines). Allow the proteins to separate on the gel for the recommended length of time, or until the tracking dye reaches the bottom of the gel.
Note: When the current is flowing, you should see bubbles forming on the electrodes.
8. After the electrophoresis is finished, TURN OFF the power supply, disconnect the leads, and carefully REMOVE the cover.
9. REMOVE the gel cassette from the electrophoresis apparatus and immediately PROCEED to staining instructions.
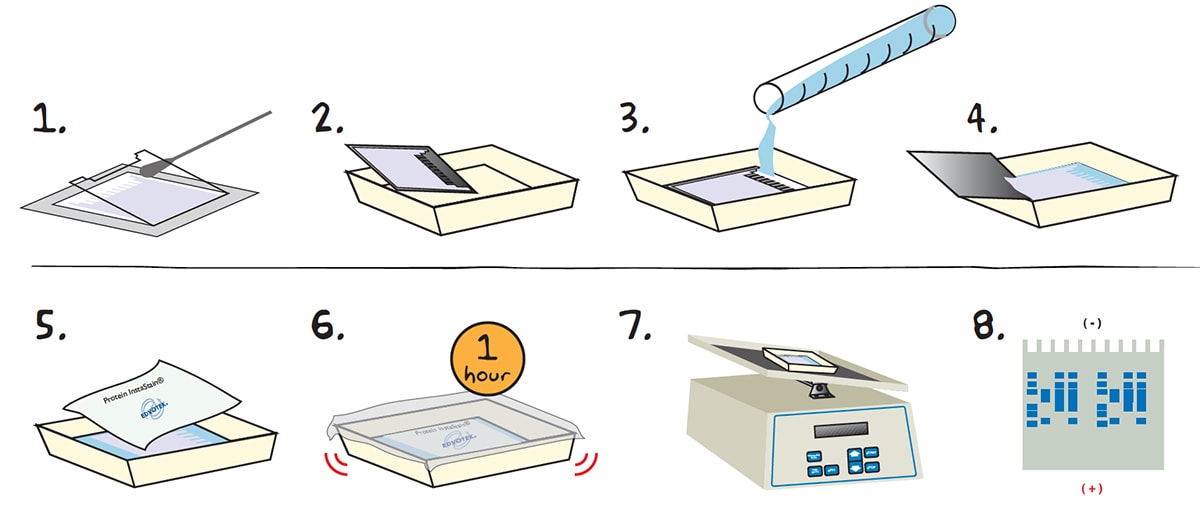
Staining the Gel with Edvotek® Protein InstaStain®:
1. After electrophoresis, LAY the cassette down and REMOVE the front plate by placing a thin spatula or screwdriver at the side edge and gently lift it away form the larger back plate. In most cases, the gel will stay on the back plate. If it partially pulls away with the front plate, let it fall onto the back plate. Handle very carefully as the thin gels are extremely fragile.
2. TRANSFER the gel on the back plate to a clean tray.
3. ADD a sufficient volume (approximlately 100 mL) of the staining/destaining solution into the tray to COVER the gel and back plate. (Use enough solution to cover the gel).
4. Carefully REMOVE the back late from the tray, leaving just the gel in the tray containing the fixative solution. NOTE: If the gel sticks to the plate, pipette some of the staining/destaining solution onto the gel and gently nudge the gel off the plate.
5. Gently FLOAT a sheet of Protein InstaStain® with the stain side (blue side) down in the staining/destaining solution. COVER the gel with plastic wrap to prevent evaporation.
6. Allow the Protein InstaStain® paper to STAIN the gel for an hour at room temperature with gentle occasional or continuous agitation.
7. REMOVE the paper after an hour and allow the gel to gently AGITATE on a rocking platform or just on the lab bench for 1-3 hours or overnight.
Overnight staining of protein gels yields a more optimal result. Pour off the staining solution from step 7 the following day and add fresh staining/destaining solution to cover the gel.
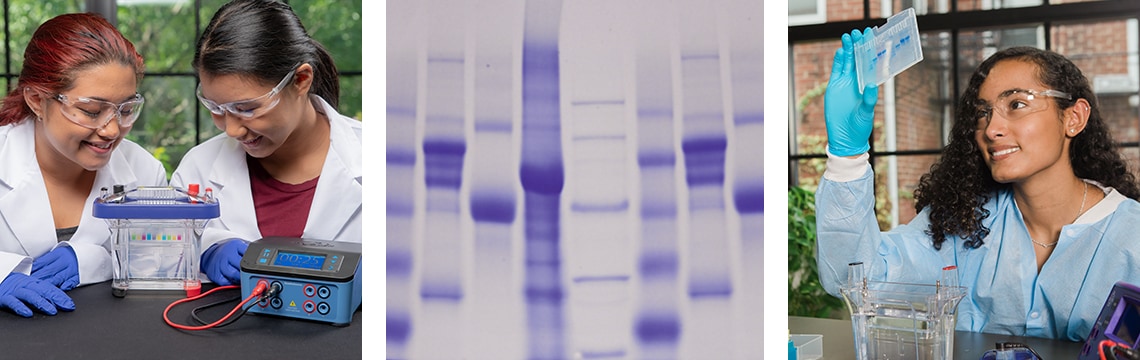
8. After staining, protein bands will appear medium to dark blue against a light background* and will be ready for excellent photographic results.
*If the gel is too dark, destain at room temperature with continuous agitation in several changes of fresh staining/destaining solution until the appearance and contrast of the protein bands against the background improve.
Separating Proteins Using SDS-PAGE Video:
Staining Polyacrylamide Gels Using Protein InstaStain® Video:
 SDS polyacrylamide-gel electrophoresis, or SDS-PAGE, is a technique that is used to separate proteins according to their molecular weight.